Build a lo-fi loop with tape, step by step
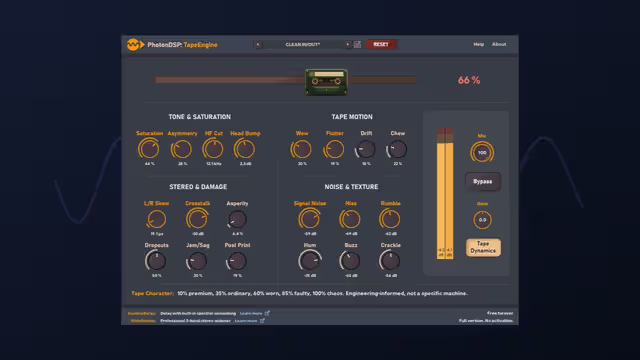
Tape-style plugins do three things: they wobble pitch (wow and flutter), roll off highs, and squash peaks with a soft saturation. Bad Tape is a free-to-check name in that family; whatever knobs your copy has, this recipe turns a clean sample loop into a dusty one. I will use generic control names, so map them to yours.
The starting loop
Take a 4-bar jazz chord sample at 82 BPM, clean and slightly bright. Add a boom-bap drum pattern underneath. Insert the tape effect on the chord track first, not the master.
Step 1: saturation
Raise input drive until you see the meter tapping 2 to 3 dB of soft compression. Stop when the chords start to sound fuzzy rather than warm.
Step 2: wow and flutter
- Wow (slow pitch drift): low, around 10 to 20 percent.
- Flutter (fast wobble): even lower, 5 to 10 percent.
- Test on a sustained chord. If the pitch clashes with the bass, reduce.
Step 3: tone
Roll the high frequencies off near 7 to 9 kHz. For a really old cassette feel go down to about 5 kHz. Keep some low end; do not filter below 60 Hz.
Step 4: noise
If hiss is on offer, put it just below audibility: you should notice it only when the loop stops.
Tape settings by mood
| Mood | Drive | Wobble | High cut |
|---|---|---|---|
| Subtle glue | Low | Almost none | 12 kHz+ |
| Lo-fi study beats | Medium | Low to medium | 7 to 9 kHz |
| Worn cassette | Medium to high | Medium | 4 to 6 kHz |
| Broken tape intro | High | High, automated | Sweeping |
Where to put it
- On the sample only: keeps drums crisp and punchy.
- On a music bus: glues chords and melody together.
- On the master: use just a touch; it will also dull the drums.
Troubleshooting
- Beat feels sloppy: flutter is too high or affects the drums. Move the effect off the drums.
- Bass got muddy: the saturation added low-mid weight. Cut around 200 Hz before the plugin.
- Too quiet after processing: the high cut and drive reduced level; use the output knob.
- Pitch sounds off: reduce wow, or switch it off for tuned melodic leads.
Automating a tape stop
- Automate pitch or speed down over one beat at the end of bar 4.
- Pair it with a fade of about 200 ms for the last instant.
- On the downbeat, snap everything back to normal.
A/B test
Bounce the loop clean and with tape. Play both under drums at equal loudness. Keep the tape version only if the chords still feel in time. If the character disappears in a phone speaker, add a touch more drive rather than more hiss.
Pairing and links
Tape effects react to level, so read our gain staging guide first. To add depth to the loop, a free space effect like Valhalla Supermassive works well after the tape stage, and for beat ideas you can try this UK garage sample pack. More tools are listed in the free VST collection.
Confirm the price
Free status can change. Check the developer's official page for current pricing, formats and supported systems before you download.
Tape in a full beat, not just a loop
Once the chords sound right, treat the drums differently. Put a lighter tape setting on the drum bus, just enough saturation to round the transients, and no wobble at all. Then add a slightly stronger setting on the sample. Two different amounts of tape make a beat feel like it was recorded in a room rather than processed in one place.
Vinyl crackle and tape together
Crackle sits best on its own track with a high-pass near 300 Hz and a level 20 to 25 dB below the chords. Feed it through the same tape effect so it wobbles with everything else, which glues the noise into the music.
Vocals and tape
Vocal samples take tape well if the wobble is subtle. For a lead vocal you record yourself, use the effect on a parallel bus at about 20 percent so consonants stay clear.
Genre tips
- Lo-fi hip-hop: medium wobble on keys, none on drums, high cut near 8 kHz.
- Bedroom pop: light saturation on the whole mix bus for cohesion.
- Synthwave: a touch of flutter on pads and less high cut, so it sounds retro but still shiny.
- Ambient: heavy wow on a sustained texture, sent to a reverb afterward.
Checklist before you export
- Toggle bypass: does the tape version still groove?
- Check in mono for lost highs.
- Confirm the bass is not wobbling.
- Lower the output if the plugin made the loop louder.
FAQ
Does tape emulation replace a real tape machine?
It borrows the character, not every behaviour. For most lo-fi work that is enough.
Should wobble be on every track?
No. Put it on chords or melody; a wobbling kick and bass feels unstable.
How much tape is too much?
When vocals or leads lose consonants, or the groove drifts, pull it back.
Product and download reference
Bad Tape VST: Free Tape Plugin Guide and Tips — reference at www.deniseaudio.com. Check the destination for current versions, compatibility, licence, price and any registration requirements. A reachable page is not a guarantee that a past offer is still free.
Get Bad Tape from Denise Audio